Wednesday, August 31, 2011

Food Revolution Sloppy Joes


Have you checked out the Food Revolution movement that has been sweeping the nation? Sponsored by Jamie Oliver and the American Heart Association, it is an effort to re-introduce fresh food in people’s lives. A big push of the Food Revolution is to clean up school lunches and create menus that feature more vegetables, fruits and whole foods. The Food Revolution team worked tirelessly to remove flavored milk from Los Angeles Public Schools! That is a lot of unnecessary sugar cut out of children’s diets! Very cool! (You can easily google data regarding the sugar content in flavored milk.)

Considering the alarming rate of obesity and diabetes in our country, I really don’t see why these measures are being debated at every level. This topic might even be offensive to some of you reading this blog post today. People’s lives and health are at stake here…. Educating people how to cook and what to eat is basic in my opinion.  (You can also easily google data regarding obesity and diabetes in this country.)

It’s pretty surprising that I feel so strong about this movement, because in all other areas I believe in total personal freedoms, personal responsibility, and personal decision making. I do think people have the right to eat whatever they choose, including high-fat, high-sodium, highly-processed foods…. The problem comes when people have no choices… or when people are undereducated about nutrition and the effects food has on their health.  No one can make any good decision without correct information.

I will step off my soapbox now and invite you to discover the Food Revolution on your own. You can easily learn as much as you want about this movement on the internet. I have a link on the right side of this blog where you can sign a petition and find links to lots of great stuff – including excellent recipes, including this one. (There are great recipes on the American Heart Association web site also.)

These sandwiches were very good – but not really like the Sloppy Joes I am used to. (My Sloppy Joe recipe is posted on my Mlive blog here.) They had a nice sweetness and hearty texture. I added more tomato sauce and more beans than Jamie Oliver’s original recipe, which you can find here. I also added red pepper flakes.


Here’s what you need:
¾ pound lean ground turkey (with the least amount of fat you can purchase)
Chopped onion
Chopped green pepper
1 C tomato sauce
2 T cider vinegar
1 ½ T brown sugar
1 T honey
2 t Dijon mustard
½ t chili powder
Red pepper flakes to taste
1 X 15 ounce can kidney beans (today I used pinto beans)- drained and rinsed


Here’s what you do:
Brown the meat with the onions and peppers. Cook for about 5-10 minutes until the veggies are getting tender. Add the remaining ingredients. Simmer until thickened and veggies are nice.

I served mine on whole wheat tortillas. They would be great on buns also.

(printable recipe)


Saturday, August 27, 2011

Tomatillo Salsa

(I shared this great recipe on a great "Green Day" link-up )


Quit walking past the tomatillos in the produce section of your market. (You know who you are!)
Pick up a pound and try this salsa – it’s AWESOME!  Think tart not spicy.

Here’s what you need:
1 pound tomatillos
1 fresh jalapeno pepper
1 small white onion
5-6 cloves garlic
1 t salt
1 lime
1 bunch cilantro


Here’s what you do:
Bring a pot of water to a boil. Husk and rinse the tomatillos. Quarter the onion. Peel the garlic. Remove the stem from the jalapeno and remove the seeds and veins if you want – I leave them in. Drop the veggies and salt into the boiling water. Simmer for about 5-10 minutes, until the tomatillos are soft, but have not burst.


Remove the tender veggies from the cooking liquid with a slotted spoon. Add the zest of a lime, the juice of a lime and a huge handful of chopped cilantro.  Sometimes I add just a bit of the cooking liquid if the finished product is too thick.


Whirl until well blended – Be careful with this step – Hot liquids in the processor can be dangerous!

Enjoy! 


Wednesday, August 24, 2011

Cookwell and Company Tomatillo Salsa Pork Enchiladas Supremo!


There are many, many giveaways and contests out there on the internet – and it’s no different in the world of cooking blogs. I admit I have entered a few and I even won a cook book once which was fun! Well, when Wendy from The Weekend Gourmet announced a recipe contest using Cookwell and Company Tomatillo Salsa, I jumped on it.

I actually ordered the salsa from Austin, Texas to boost my chances in the contest. So glad I did because the stuff is amazing! Fire-roasted tomatillos, cilantro, onions and green chilis. Yum. This Michigan girl loves green salsa and Cookwell and Company’s is excellent!

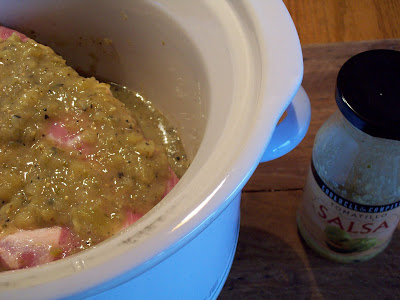
We love Mexican food around here and eat it about twice a week. This is one of our favorite meals. Once the meat is cooked and shredded, the applications are endless. You could put the meat on tostadas. You could put it in quesadillas, soups or even use it in sandwiches.  The beauty of cooking the meat in the crock pot is that the superior flavor of the salsa is enhanced by the juices of the pork – a double taste whamy! The resulting broth is rich, tangy, spicy and good enough to drink!

Here’s what you need:
4 pound boneless pork butt roast (approximately)
1 16 oz jar Cookwell and Company Tomatillo Salsa
16 x 7 inch flour tortillas
10 ounces Monterrey Jack cheese, shredded
Pickled jalapenos, green chilis, avocadoes, lettuce, tomatoes, limes, sour cream and cilantro for garnish


Here’s what you do: 
Place the salsa and meat in a crock pot. (It doesn’t look like much now, but just fast forward 6 hours!) Cook on high for about 4-6 hours or on low for about 6-8 hours. Remove meat with tongs to a baking sheet with sides. Shred the meat, being sure to remove any fat or other things you don’t want to eat.  


Strain the liquid into a pot or bowl which you have placed in a larger bowl of ice. This unusual method helps to congeal the fat and makes it super easy to remove.  Don’t skip this step - by removing the fat you enhance the flavor of the broth.


Wrap a small portion of meat in each tortilla and place seam side down in a glass baking dish. Pour the broth over the tortillas – it should come about one half inch up the sides of the enchiladas. Smother with Montero Jack cheese, jalapeno slices or green chilis. (These freeze beautifully at this point)

Bake 350 degrees for ½ hour. The top of each enchilada is toasty and cheesy and the bottom of each enchilada is chewy and most delicious from the glorious salsa!

Well, we’ll see if I have a chance at winning the contest – I promise you that these are winners in my home! Thanks to Cookwell and Company for their excellent product!


                        Irish Soda Bread with Golden Raisins 


Thursday, August 18, 2011

Spice Rack Challenge: Cumin (Edamame Hummus with Spiced Pita Chips)

My camera did no justice to the beautiful, beautiful color of this dip - trust me!

As you may know, I am participating in a monthly Spice Rack Challenge, hosted by Mother’s Kitchen. Her post announcing cumin as August’s spice is especially fun and interesting…. What do chickens, Ann Arbor and cumin have in common? Click here to find out!  

If you are a cumin lover (like me) then you will absolutely LOVE this dip and these pita chips. Both recipes can be found on  www.finecooking.com . Originally from Ellie Krieger, you know they will be excellent! We polished all this off in one day and I will definitely be making more soon.


Here’s what you need for the dip:
2 C edamame (I used fresh. You can also use frozen and cook according to package directions)
1 C silken tofu, drained
½ t salt
Black pepper to taste
1 ½ t cumin
3 cloves garlic
¼ C olive oil
1/3 C fresh lemon juice

Place everything in a food processor and blend until very smooth. (Do you know the trick of dropping the garlic cloves into the processor while it is running? The result is very finely minced garlic. No one wants to bite into a big piece of raw garlic, right?)


Here’s what you need for the chips:

6 whole wheat pita breads, cut into 6-8 wedges and split
¼ C olive oil
2 t cumin
1 t ground coriander
½ t cayenne pepper
1 t garlic powder
½ t black pepper
½ t salt

Combine the oil and spices in a bowl. Add the pita bread and use your hands to mix it well. Bake on 2 baking sheets at 375 degrees for 15 minutes. Turn the chips over after 7 minutes. 


Tuesday, August 16, 2011

The Apple Lady’s Apple Cake


I will admit: I have no idea who Patricia Wells is and I have never before heard of “The Paris Cookbook.” (is that bad?) I will also say that this recipe (from the same cookbook, by the same author) has totally enchanted me. I have made it three times in the past few weeks – and it’s not even apple season here. In fact, the apples are really, really crummy right now.  (Next time I make it I will use peaches.)

My mom made this for me when I was recently visiting her and I had to copy down the recipe. (She has the greatest stash of tried and true recipes.) I proceeded to make this cake (more like a pancake or crepe because of the eggs) a number of times for my family.  

Before sitting down here today to blog about it, I did a quick search on the internet…. Lo and behold… It’s a well- known recipe, well-documented on every recipe site, well-received my all who have made it.

It’s probably already in your stack of recipes…….. Shows what I know…… anyway, it’s my new favorite thing to eat.


Here’s what you need:
½ C flour
1/3 C sugar
1 T baking powder
1/8 t salt
½ t vanilla
2 eggs, beaten
2 T vegetable oil
1/3 C whole milk
4 apples, cored, peeled, sliced thinly

Topping:
1/3 C sugar
1 egg, beaten
3 T melted butter


Mix flour, sugar, baking powder and salt. Blend together the eggs, oil, milk and then add the wet ingredients to the dry. Add in the apple slices and mix well.

Spoon the apple mixture into a well-greased 8-inch springform pan. The original recipe calls for a 9-inch springform pan. I used a 9 inch tart pan with a removable bottom…. Whatever… just adjust the baking times accordingly. Be sure to place your pan on a baking sheet!

Bake for about 20 minutes in a 400 degree oven.


In the meantime: Mix the topping ingredients. Spoon the topping over the cake and bake for another 10 minutes. Be careful to watch the cake closely on this step. You don’t want to over brown the topping.

Cool. Remove rim. Serve for breakfast, lunch, dinner, dessert, bed-time snack. Serve with whipped cream, ice cream, coffee, milk, or simply eat it with your fingers.


Sunday, August 7, 2011

Cooking 101

My sons (and a willing girlfriend) made this lovely meal with just the tiniest bit of supervision from me. Get in the kitchen with the people you love and pass on your love of cooking good food to them. 

I recently had the rare opportunity to spend an afternoon alone in a hotel room. I also did the rare thing of turning on daytime TV and I stumbled upon a talk show. What I saw really interested me, but not in the good way. I was intrigued and had to finish watching.

The host had invited a chef to teach both him and his guest how to cook a meal. Apparently, he had never prepared a meal for himself and apparently his guest had never even been in a kitchen. She was a young woman about to be married and the premise of the segment was to teach her how to cook a meal for her new husband.

The meal was a simple one: grilled asparagus and chicken piccata. The teacher was excellent and the students were willing, but what fascinated me was their hesitation at every step. It was apparent that neither had ever trimmed a spear of asparagus, couldn’t identify olive oil, couldn’t sauté garlic and didn’t know how to dredge a piece of chicken. Of course, in the end everything in TV land turned out fine, the meal made it to the plate, the audience went wild and the newly initiated cooking students were rightly proud of themselves for their first-ever home-cooked meal.

What I took away from the show was how important it is to pass on basic cooking skills to our children, our friends, our spouses, etc. I want my children to be able to put good food on the table, to understand how flavors work together, to see how food can enrich a person’s life and also to understand the satisfaction of feeding not only themselves, but other people.

Maybe you are like the young woman I saw on TV. I’m not sure how you learn to cook except by lots and lots of practice. Start simple, like with the meal here. Don’t get discouraged. Keep it simple and wholesome. Read basic cookbooks. Think balance. Imagine how the plate will look when you are done. Learn and focus on classic techniques. Keep at it!

Recipes can be found here: Chicken Piccata and Asparagus with Balsamic Syrup

One Year Ago: Chicken Queso Burger
                        Pizza Burger 


 Maybe you noticed that I also posted this article on my Mlive blog.... I know that's blogging cardinal rule number one (never re-post!). I just had to post in two places because I feel so strongly about this topic! Can you forgive? :) 


Wednesday, August 3, 2011

Rhubarb Oatmeal Crumble


Would you, my dear readers, mind one more blog post or photo of rhubarb? I guess I might be a little single minded about my rhubarb this summer…. taking photos….fretting about the weeds…..searching the internet for new rhubarb recipes…..compulsively using every stalk of the stuff from my garden……

I did find the best, best Big Crumb Rhubarb Coffee Cake. Made it three times…. Just to be sure…. “Kinda fussy recipe, but really good.” (a quote from a friend who made it….)

I did discover something called rhubarb simple syrup which I drank with all my beverages, both soft and hard. “Tim, let’s try it with rum tonight.”

And I found this recipe….. and also made it a number of times….much to the delight of my boys…. “Mom, make that rhubarb thing again.”

Please visit Honestly Good Life to see the original post and my inspiration for this – I only tweaked it a bit by using less sugar. I promise you will enjoy your visit…. Be sure to check out Jessica’s great pictures here and here.


Here’s what you need for the ‘crumble’ layer:
1 C flour
¾ C rolled oats
¾ C brown sugar
½ C melted butter
1 t cinnamon

Here’s what you need for the ‘filling’ layer:
¾ C granulated sugar
2 T cornstarch
1 t vanilla
1 C water
4 C chopped rhubarb


Here’s what you do:
Prepare the crumble layer by mixing the flour, oats, brown sugar, melted butter and cinnamon in a bowl. Press half in a 9 X 9 baking pan. Reserve the remaining half of crumble for the topping.

Prepare the filling layer by bringing all the ingredients to a soft boil: sugar, cornstarch, vanilla, water and rhubarb. Allow to cook and thicken – but not too much – it’s OK that it’s very watery.

Pour rhubarb over crumble layer. Top with remaining crumble mixture.

Bake 350 degrees for about 45 minutes.

(printable recipe)