Wednesday, September 28, 2011

Cinnamon Apple Bundt Cake


I’ve kinda been in a cooking slump lately… you know, ordering pizza, swinging through Jimmy John’s for sandwiches, picking up pre-made food at the grocery store. We’ve actually been eating out lately, but often that does not satisfy. I usually wish we had saved the money and eaten at home. Even omelets at home taste better than some restaurant food, right?

My favorite stand-by dinner is grilled cheese and tomato soup; however, I do make a killer grilled cheese (brioche bread with real butter and three different types of cheeses) and I do serve homemade tomato soup, so I guess I get a break with that menu.


Last weekend I purchased some apples and somehow, that has inspired me to get back in the kitchen. This cake was easy and I made it much healthier by using less sugar, less oil, and half wheat flour. The butter sauce could not be passed up….. it absolutely made the cake.


Here’s what you need:
For the Cake:
2 heaping cups of peeled apples, thinly sliced
3 T white sugar
2 T cinnamon
½ C vegetable oil
½ C applesauce
1 C white sugar
4 eggs
3 t vanilla
¼ C orange juice
1 ½ C white flour
1 ½ C wheat flour
1 T baking powder
1 t salt

For the Glaze:
¼ C butter
1/3 C orange juice
2/3 C sugar

Here’s what you do:
Toss the apple slices in the cinnamon and sugar. Set aside.

Beat the oil, applesauce, sugar, eggs, vanilla and orange juice until well incorporated. Add the flours, baking powder and salt.


Spoon about 1/3 of the batter in a well-greased bundt pan. Arrange the apple slices over the batter. Spoon the remaining batter over the apples.

Bake at 325 degrees for about 60 minutes. Check it after about 50 minutes.


To make the glaze: melt the butter, orange juice and sugar together and spoon over the cake. I started while the cake was still in the pan. (You can see the holes I poked in the cake with a wooden skewer.) Then I turned the cake out of the pan and continued spooning the glaze. I also used a pastry brush to apply the glaze. Be patient – it all fits in there and you want it, trust me.


Saturday, September 24, 2011

Basic Hummus


Maybe some of you have figured out by now that I am a part-time Middle School geography teacher. (I also teach other classes, but let’s not get into that now. When you work at a small Lutheran school, you have to be flexible and able to teach/do lots of different things – keeps life interesting, I say!) My 7th grade curriculum this year is the Eastern Hemisphere and we started at the logical beginning – the Middle East. Remember learning about Mesopotamia, the Cradle of Civilization?

I love to cook for my students. I know they learn tons about culture and places through taste. It’s a very powerful experience for them. Sometimes I go all out and make an entire meal: paella when studying Spain or turkey in mole sauce when studying Mexico. This week I kept it simple and made hummus. Admittedly, not all the kids like all the food I make, but it’s good for them to be exposed to it.


So this is my basic, basic hummus recipe. If you have never tasted hummus, you are in for a great treat. You can bump up the flavor by adding cumin or cayenne pepper, more garlic or even scallions. But we like it plain. If you have never used tahini, you will be surprised how unusual it is!
Healthy, low-fat and totally addicting! Dip Away!


Here’s what you need:
2 cans garbanzo beans (chick peas) well rinsed
6 T tahini
1 large clove garlic
6 T lemon juice
½ C water
1 t salt

Here’s what you do:
WHILE THE BLADE IS RUNNING, drop the garlic in a food processor. This is the best trick to get teeny pieces of garlic.  You can see the little specs in the photo.


Add the remaining ingredients and blend well. Adjust water and seasonings. Mine here is a bit thick. Serve with crackers, pita, or sliced veggies. To make a beautiful presentation, you can drizzle olive oil over it and sprinkle a bit of paprika for color.

(printable recipe)

One Year Ago: Texas Caviar
                          Tomato Press (this is a good post for those of you who love kitchen gadgets)

Wednesday, September 21, 2011

Salmon Festival


One of our favorite dune paths
We live in one of the most beautiful places in the country – on the shores of Lake Michigan. Our beaches and sand dunes are unparalleled. Our water recreation and nature preserves for hiking are among the best.  I can’t even begin to describe how satisfying it is to drive by the lake each and every day to and from work.

The 'Big Lake' - full of salmon!
We often comment that no matter what the weather, the lake is beautiful. Often peaceful and blue skies; sometimes stormy and black skies; once in a while frozen with heavy snow clouds low over the lake. The parking lot at the beach almost always has a handful of people just sitting in their cars, watching the water and weather – every day of the year, but most especially when the weather is dramatic.  I think maybe – just maybe- Michiganders sometimes forget what a blessing it is to have all this fresh water surrounding us.


This guy's boiling potatoes

As a food lover and a food blogger I must say  a big, big bonus from living on the ‘Big Lake’ (as we affectionately call it) is the fresh salmon that is so plentiful this time of year. Last weekend our little town hosted a two-day Salmon Festival, and I attended it all.

Friday night’s Fish Boil is more casual – they serve 500 pounds of salmon! Corn on the cob, boiled potatoes, onions and a roll round out the meal….. oh, and lots of beer and good music!

Grilled salmon served with potato wedge and heirloom tomato - all of it had a  hard cider glaze - really good! 

Saturday is the popular salmon tasting – a competition between area restaurants. You get to sample various types of salmon:  salmon sliders, salmon sushi, salmon mousse, grilled salmon….oh, and lots of Michigan wines and good music! Our favorite was a simple Asian inspired salmon – grilled and served with a sesame oil dressing and then covered with sesame seeds.

Grilling the salmon sliders. Seems a shame to call them that - they were pretty fancy!

My pictures don’t begin to capture the great atmosphere of the event, but hopefully you get a feel for how much we love salmon here in West Michigan.

I recently posted my Brown Sugar Glazed Salmon here….I think you’ll like it.  Enjoy!

One Year Ago: Spiced Rum Cake (this one has a sad ending!)

Friday, September 9, 2011

Tres Leches Cake


This is my favorite cake of all time and one of my favorite recipes. I prefer it to any chocolate cake, any cheesecake, any bundt cake. I think cake makes any meal better and this one is by far the best of all.  Thanks to my friend Sue for this recipe. I spent years searching for the perfect Tres Leches recipe and I have made my way through some pretty average ones – either too sweet or too wet.  Now this is the only recipe I will ever use.  

I made this a few weeks ago for a Mexican Dinner Fiesta I donated to the Lutheran School where I work. The meal was included in an auction we have every spring. My menu was a simple one of jalapeno poppers and margaritas, tortilla soup, beef chipotle burritos and homemade refried beans with all the fixins’. To top off the evening, I served this beautiful cake.  Tres Leches is very light and perfect after a heavy meal. Even though it is a Latin American dessert, it would be appropriate to serve after any type of meal.

Surprisingly, this cake is not at all soggy…. it is perfectly moist. Read through the recipe thoroughly before making, because it has a few uncommon steps.  Don’t be intimidated by the process! It is very easy and totally, totally worth it.


Here’s what you need:
1 C confectioner’s sugar
5 egg yolks
5 egg whites
1/3 C milk
1 t vanilla
1 C flour
1 ½ t baking powder
1 14 oz can sweetened condensed milk
1 12 oz can evaporated milk
1 pt. heavy whipping cream (some for the cake and some for the topping)


Here’s what you do:

Preheat oven to 350 degrees. Butter and flour a 9 inch springform pan.  Beat the yolks with ¾ C of confectioner’s sugar until light in color and double in volume. Stir in milk, vanilla, flour and baking powder.

In small bowl, beat egg whites until soft peaks form. Slowly add remaining ¼ C confectioner’s sugar. Beat until firm, but not dry.


Fold egg whites into egg yolk mixture.

Pour into prepared pan. Bake 45-50 minutes. Allow to cool 10 minutes. Loosen edge of cake with knife before removing rim.


Cool cake completely. Place on serving plate. Use a two prong meat fork and pierce surface of cake multiple times. Mix together the condensed milk, evaporated milk and ¼ C heavy cream. Discard 1 C of this milk mixture. Spoon the remainder of the three milk mixture slowly and patiently over the entire cake, allowing the cake to absorb all of the milk. This takes about 10 minutes, so be patient. It will all fit, just be patient!


Frost with whipped cream and fresh berries.  Serve with pride – it is a special treat! 

(printable recipe)

One Year Ago: Zucchini Crust Pizza - another favorite recipe of mine and one of my favorite summer meals.

Monday, September 5, 2011

Tequila Bars


My little camera and the early morning light did no justice to these.


“One tequila - Two tequila - Three tequila - Four!”  What’s that come from? Some kind of drinking game, I bet…. Well, I never played that game, but I do love tequila.  I must say after a long day, nothing tastes better to me that a great margarita. And I am sure you have noticed how much Mexican food we eat around here.

This is my first Guy Fiere recipe.  Actually it’s my second Guy Fiere recipe. I did make his outstanding Tortilla Soup last week for a Mexican Dinner party I hosted…. Many, many thanks to Gina at SPCookiequeen for the recommendation. (Gina, you saved the day!)

This is one of those recipes that I clipped (tore) out of a food magazine. It has been in storage (laying around my kitchen counter) for a while (about a year.)  With all three of my kids home for a week, I needed some extra goodies, so I dug through the pile. This one is definitely a keeper.  Hats off to Guy Fiere.


Here’s what you need:
1 12 ounce box Nilla wafers (I used reduced-fat)
½ C pine nuts
½ C butter (original recipe calls for 1 ½ C, but ½ is plenty!)
1/3 C tequila (notice in the photo above – the off-brand condensed milk but the expensive, high quality tequila…. No comment)
½ C fresh lime juice (I think some lime zest would be appropriate here also)
5 egg yolks plus 2 egg whites
1 14 ounce sweetened condensed milk
1 T sugar

Here’s what you do:

Pulse the wafers and nuts in a processor. Add the melted butter. Remove ½ cup of crumbs to use as the topping and set it aside. Press the remaining crumbs in a 9 x 13 pan and bake at 350 degrees for about 15 minutes. (Lots of people on the foodnetwork site commented that they wished they had sprayed the pan before baking, but mine did not stick one bit.)


In the meantime, make the lime filling. Whisk together the lime juice, tequila, egg yolks and sweetened condensed milk.


In another bowl, beat the egg whites with the sugar using a beater. Keep going until you have soft peaks.

Fold the egg whites into the lime mixture. Spread the lime topping over the crust and bake for another 20 minutes. Sprinkle the reserved crumbs on top of the bars. CHILL before serving at least 2 hours or overnight…… hard to wait!

Wednesday, August 31, 2011

Food Revolution Sloppy Joes


Have you checked out the Food Revolution movement that has been sweeping the nation? Sponsored by Jamie Oliver and the American Heart Association, it is an effort to re-introduce fresh food in people’s lives. A big push of the Food Revolution is to clean up school lunches and create menus that feature more vegetables, fruits and whole foods. The Food Revolution team worked tirelessly to remove flavored milk from Los Angeles Public Schools! That is a lot of unnecessary sugar cut out of children’s diets! Very cool! (You can easily google data regarding the sugar content in flavored milk.)

Considering the alarming rate of obesity and diabetes in our country, I really don’t see why these measures are being debated at every level. This topic might even be offensive to some of you reading this blog post today. People’s lives and health are at stake here…. Educating people how to cook and what to eat is basic in my opinion.  (You can also easily google data regarding obesity and diabetes in this country.)

It’s pretty surprising that I feel so strong about this movement, because in all other areas I believe in total personal freedoms, personal responsibility, and personal decision making. I do think people have the right to eat whatever they choose, including high-fat, high-sodium, highly-processed foods…. The problem comes when people have no choices… or when people are undereducated about nutrition and the effects food has on their health.  No one can make any good decision without correct information.

I will step off my soapbox now and invite you to discover the Food Revolution on your own. You can easily learn as much as you want about this movement on the internet. I have a link on the right side of this blog where you can sign a petition and find links to lots of great stuff – including excellent recipes, including this one. (There are great recipes on the American Heart Association web site also.)

These sandwiches were very good – but not really like the Sloppy Joes I am used to. (My Sloppy Joe recipe is posted on my Mlive blog here.) They had a nice sweetness and hearty texture. I added more tomato sauce and more beans than Jamie Oliver’s original recipe, which you can find here. I also added red pepper flakes.


Here’s what you need:
¾ pound lean ground turkey (with the least amount of fat you can purchase)
Chopped onion
Chopped green pepper
1 C tomato sauce
2 T cider vinegar
1 ½ T brown sugar
1 T honey
2 t Dijon mustard
½ t chili powder
Red pepper flakes to taste
1 X 15 ounce can kidney beans (today I used pinto beans)- drained and rinsed


Here’s what you do:
Brown the meat with the onions and peppers. Cook for about 5-10 minutes until the veggies are getting tender. Add the remaining ingredients. Simmer until thickened and veggies are nice.

I served mine on whole wheat tortillas. They would be great on buns also.

(printable recipe)


Saturday, August 27, 2011

Tomatillo Salsa

(I shared this great recipe on a great "Green Day" link-up )


Quit walking past the tomatillos in the produce section of your market. (You know who you are!)
Pick up a pound and try this salsa – it’s AWESOME!  Think tart not spicy.

Here’s what you need:
1 pound tomatillos
1 fresh jalapeno pepper
1 small white onion
5-6 cloves garlic
1 t salt
1 lime
1 bunch cilantro


Here’s what you do:
Bring a pot of water to a boil. Husk and rinse the tomatillos. Quarter the onion. Peel the garlic. Remove the stem from the jalapeno and remove the seeds and veins if you want – I leave them in. Drop the veggies and salt into the boiling water. Simmer for about 5-10 minutes, until the tomatillos are soft, but have not burst.


Remove the tender veggies from the cooking liquid with a slotted spoon. Add the zest of a lime, the juice of a lime and a huge handful of chopped cilantro.  Sometimes I add just a bit of the cooking liquid if the finished product is too thick.


Whirl until well blended – Be careful with this step – Hot liquids in the processor can be dangerous!

Enjoy! 


Wednesday, August 24, 2011

Cookwell and Company Tomatillo Salsa Pork Enchiladas Supremo!


There are many, many giveaways and contests out there on the internet – and it’s no different in the world of cooking blogs. I admit I have entered a few and I even won a cook book once which was fun! Well, when Wendy from The Weekend Gourmet announced a recipe contest using Cookwell and Company Tomatillo Salsa, I jumped on it.

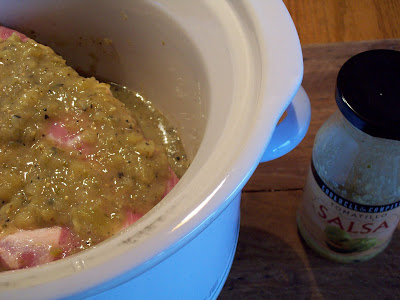
I actually ordered the salsa from Austin, Texas to boost my chances in the contest. So glad I did because the stuff is amazing! Fire-roasted tomatillos, cilantro, onions and green chilis. Yum. This Michigan girl loves green salsa and Cookwell and Company’s is excellent!

We love Mexican food around here and eat it about twice a week. This is one of our favorite meals. Once the meat is cooked and shredded, the applications are endless. You could put the meat on tostadas. You could put it in quesadillas, soups or even use it in sandwiches.  The beauty of cooking the meat in the crock pot is that the superior flavor of the salsa is enhanced by the juices of the pork – a double taste whamy! The resulting broth is rich, tangy, spicy and good enough to drink!

Here’s what you need:
4 pound boneless pork butt roast (approximately)
1 16 oz jar Cookwell and Company Tomatillo Salsa
16 x 7 inch flour tortillas
10 ounces Monterrey Jack cheese, shredded
Pickled jalapenos, green chilis, avocadoes, lettuce, tomatoes, limes, sour cream and cilantro for garnish


Here’s what you do: 
Place the salsa and meat in a crock pot. (It doesn’t look like much now, but just fast forward 6 hours!) Cook on high for about 4-6 hours or on low for about 6-8 hours. Remove meat with tongs to a baking sheet with sides. Shred the meat, being sure to remove any fat or other things you don’t want to eat.  


Strain the liquid into a pot or bowl which you have placed in a larger bowl of ice. This unusual method helps to congeal the fat and makes it super easy to remove.  Don’t skip this step - by removing the fat you enhance the flavor of the broth.


Wrap a small portion of meat in each tortilla and place seam side down in a glass baking dish. Pour the broth over the tortillas – it should come about one half inch up the sides of the enchiladas. Smother with Montero Jack cheese, jalapeno slices or green chilis. (These freeze beautifully at this point)

Bake 350 degrees for ½ hour. The top of each enchilada is toasty and cheesy and the bottom of each enchilada is chewy and most delicious from the glorious salsa!

Well, we’ll see if I have a chance at winning the contest – I promise you that these are winners in my home! Thanks to Cookwell and Company for their excellent product!


                        Irish Soda Bread with Golden Raisins 


Thursday, August 18, 2011

Spice Rack Challenge: Cumin (Edamame Hummus with Spiced Pita Chips)

My camera did no justice to the beautiful, beautiful color of this dip - trust me!

As you may know, I am participating in a monthly Spice Rack Challenge, hosted by Mother’s Kitchen. Her post announcing cumin as August’s spice is especially fun and interesting…. What do chickens, Ann Arbor and cumin have in common? Click here to find out!  

If you are a cumin lover (like me) then you will absolutely LOVE this dip and these pita chips. Both recipes can be found on  www.finecooking.com . Originally from Ellie Krieger, you know they will be excellent! We polished all this off in one day and I will definitely be making more soon.


Here’s what you need for the dip:
2 C edamame (I used fresh. You can also use frozen and cook according to package directions)
1 C silken tofu, drained
½ t salt
Black pepper to taste
1 ½ t cumin
3 cloves garlic
¼ C olive oil
1/3 C fresh lemon juice

Place everything in a food processor and blend until very smooth. (Do you know the trick of dropping the garlic cloves into the processor while it is running? The result is very finely minced garlic. No one wants to bite into a big piece of raw garlic, right?)


Here’s what you need for the chips:

6 whole wheat pita breads, cut into 6-8 wedges and split
¼ C olive oil
2 t cumin
1 t ground coriander
½ t cayenne pepper
1 t garlic powder
½ t black pepper
½ t salt

Combine the oil and spices in a bowl. Add the pita bread and use your hands to mix it well. Bake on 2 baking sheets at 375 degrees for 15 minutes. Turn the chips over after 7 minutes. 


Tuesday, August 16, 2011

The Apple Lady’s Apple Cake


I will admit: I have no idea who Patricia Wells is and I have never before heard of “The Paris Cookbook.” (is that bad?) I will also say that this recipe (from the same cookbook, by the same author) has totally enchanted me. I have made it three times in the past few weeks – and it’s not even apple season here. In fact, the apples are really, really crummy right now.  (Next time I make it I will use peaches.)

My mom made this for me when I was recently visiting her and I had to copy down the recipe. (She has the greatest stash of tried and true recipes.) I proceeded to make this cake (more like a pancake or crepe because of the eggs) a number of times for my family.  

Before sitting down here today to blog about it, I did a quick search on the internet…. Lo and behold… It’s a well- known recipe, well-documented on every recipe site, well-received my all who have made it.

It’s probably already in your stack of recipes…….. Shows what I know…… anyway, it’s my new favorite thing to eat.


Here’s what you need:
½ C flour
1/3 C sugar
1 T baking powder
1/8 t salt
½ t vanilla
2 eggs, beaten
2 T vegetable oil
1/3 C whole milk
4 apples, cored, peeled, sliced thinly

Topping:
1/3 C sugar
1 egg, beaten
3 T melted butter


Mix flour, sugar, baking powder and salt. Blend together the eggs, oil, milk and then add the wet ingredients to the dry. Add in the apple slices and mix well.

Spoon the apple mixture into a well-greased 8-inch springform pan. The original recipe calls for a 9-inch springform pan. I used a 9 inch tart pan with a removable bottom…. Whatever… just adjust the baking times accordingly. Be sure to place your pan on a baking sheet!

Bake for about 20 minutes in a 400 degree oven.


In the meantime: Mix the topping ingredients. Spoon the topping over the cake and bake for another 10 minutes. Be careful to watch the cake closely on this step. You don’t want to over brown the topping.

Cool. Remove rim. Serve for breakfast, lunch, dinner, dessert, bed-time snack. Serve with whipped cream, ice cream, coffee, milk, or simply eat it with your fingers.